Sabtu, 30 April 2016

A Trip Up The Cam Time Lapse


We took the boat out for a jaunt up the River Cam last weekend. Enjoy

Click here for the video 

Is that that No Problem with us.  I think it is. Thanks for the company Sue & Vic
Read More..

Front Locker Seats

Another of those jobs thats been hanging around is the fitting, or more precisely the securing of the bow lockers.

The lids have been loosely laid on top which looked fine but was not very safe if you stepped on them going forward as they would slip.  They were cut from templates I made then scanned into a CNC router by the same firm that did the rear decks. See here.  They also routed a bull nose so now the edges wont dig into the underside of our legs.


I have placed some wooden blocks on the under side that locate against the rim of the locker then to add some security I have set in a latch in each.


Not that anything of great value is kept in them, just I had 2 left over from doing the rear deck after changing the way I secured them down.


Read More..

Finished raised floor

Part of an update,
Pics taken 11th March 09.

Finished new floor height


Centre Girders back in place


New Cut in 1st step to aft cabin, now there will be 4 steps instead of 3 and will be better


Aft Bulkhead getting reinforcing box to carry aft wall


Other side.
Once this was in I re -attached new 50mm angles to the aft wall and cut out the lower origional ones


Read More..

Jumat, 29 April 2016

Nose Cone Bow sprit

I showed this picture ages ago as it is the marked out sheet for the cone.
Some Good people at Eurofab Technologies Ltd. are to bend it on a press brake.

www.eurofab.ie

There was a smaller test piece also marked up for the setup


12th Feb we get a clear hour to do the bend as the factory is usually busy doing lots of repeat work.


First test piece 90 % correct.
We also did a piece only 2mm thick to get the bend radius correct.


Final piece ready to get bent. I had the sheet marked at 22 degree intervals, we decided that more hits at 11 degrees would give a better shape.


All setup to go. 1 piece and 1 go. !!!
The Boys werent worried.....


Naturally the piece is 100% perfect. 270 mm Dia at the top and 110mm at the bottom.
Better than I expected.
Read More..

Blue Is The Colour

Sam, the canopy maker, is coming in a couple of days so this is what has spured on the final spraying of the stern area.  Theres quite a lot of fittings that need to go on and its better that its painted first instead of masking up loads of little fittings after.

I have never used 2pac paint before this weekend.  I was impressed with how the primer went on and cured off.  Today I spent a couple of hours rubbing down then it was time for the top coat.

I have to say I am pretty pleased with my efforts.


Whos that handsome devil in the reflection?


Read More..

Kamis, 28 April 2016

Leaving Purgatory

Trailer update: I am pleased to announce that I have left corroded screw purgatory and am now in renovation heaven. The trailer, on the other hand, looks like shes been to hell and back:
Dont trust your children to me.

Shes very close to getting a coat of fresh white paint!
Read More..

Rabu, 27 April 2016

Electrifying the Galley Woodstove


www.fatscostoves.com

I found one of these little cuties on eBay for around 50 bucks several years ago-- long before I ever thought Id be in a position to build a boat. I bought it rather hopefully anyway. Lugging it to various apartments year after year as I finished college, I dreamed of the day I would warm my hands around its tiny crackling fire while moored in a Norwegian fjord. 

In January 2010, when I finally mustered the guts to get going on the boat project, I dragged it out of its box and found that it was completely encrusted in rust. The tiny door even broke off in my hand when I tried to open it. A major restoration was needed.
I decided that old-fashioned elbow grease and a wire brush were for the birds on this project. I was going to zap the rust off that thing. More technically, it is possible to electrolytically remove the rust by reducing the iron oxide Fe2O3 (aka red rust) to Fe3O4 (aka black rust), which detaches from the underlying iron and flakes off really easily. My brother Logan was visiting at the time, so we figured that if one of us got electrocuted, at least the other was there to make the drive to the county hospital. 

Basically, you get a trickle battery charger, attach the positive lead to a sacrificial anode and the negative lead to your rusted piece. This needs to be done in an electrolyte bath--- "Arm and Hammer All Natural Super Washing Soda" works best for this. Make SURE that the alligator clip attached to your anode doesnt get in the bath, because itll rust the clip pretty badly.

This site describes the process in detail. 

The setup. Note the black clip is attached to the artifact to be cleaned and the red clip is attached to a sacrificial anode. The anode should be plain steel-- not galvanized, and definitely NOT STAINLESS as this will leach toxic chromium compounds into your electrolyte solution.

Note that the alligator clip on the sacrificial anode is up and out of the electrolyte solution. You dont want to sacrifice your clip, too.

The anode is getting pretty rusty at this point. Its a good idea to take the artifact out of the solution once in a while, rub it a bit with a Scotch Brite pad to get the black rust off and put it back in a different position than it was in before. You can see all the bubbles created as water is being broken down into hydrogen and oxygen gas.
After all of that my little Fatsco stove looked pretty good. I applied some stove polish and burned a little wood fire in it. Ill include photos of the finished restoration when I receive the replacement door, latch, and hinges.
The little brother suggested we "capture the hydrogen and blow it up." I nixed that idea.


Read More..

Selasa, 26 April 2016

Aft Seat

Aft Seat has the reverse design to the gas container.


Using a 30mm plumbing pipe to create the radius on the top of the seat.


Its tacked so once its welded it will be smooth


seat supports to be fitted and a centre support yet to be fitted


I will fill in the corners to be uniform.


Read More..

Senin, 25 April 2016

Flip It Flip it Good

The time for the flip finally arrived! To have some music to flip by, listen to Devo "Whip It" and think "Flip It". Here are the lyrics I put together for it:

Crack that flip
Give your boat a slip
Step on a tack
Break your flippin back
When your project comes along
You must flip it
Before the dream sits out to long
You must flip it
With someone very strong
You must flip it
Now flip it
Into shape
Top side up
Get straight
Go forward
Move ahead
Try to protect it
Its not too late
To flip it
Flip it good
When the right time comes around
You must flip it
You will never live it down
Unless you flip it
No one gets away
Until they flip it
I say flip it
Flip it good
I say flip it
Flip it good
(Repeat from beginning)


The boat was readied for flipping by drilling 1" holes in the box that bow sat on and inserting a pipe clamp with a turnbuckle inserted around the pipe to provide a pivot point. I then rigged that up to a come-along to lift the bow. The plan was to rotate the boat like on a spit. The rear of the boat was place on a salvaged oak bannister rail and jack stands. A rope was also suspended from the ceiling joists as support during the flip.
The forms were removed from underneath the boat, the cradle put in place and with Ted and Roger doing the heavy lifting, we began the flip.


The oak support was removed and the rope and cradle used to provide a rest at half flip.
The boat now rests on the cradle and a new phase of construction is about to begin!
Read More..

Sabtu, 23 April 2016

Laminating the Chine

I half expected the boat to be engulfed by those little sandcastles that termites make when I came back to the boat shop this week after a nearly five month absence. No termites, thank goodness, just a lot of black mold. I welcome the mold. It comes with the incredible amount of rain weve received over the past several weeks. Rio Grande City is now a tolerable grassland rather than a post-apocalyptic dust bowl. 

NASA was wonderful. I developed some algorithms for optimizing medical kits for spaceflight. And met real astronauts. The whole experience was incredibly inspiring. Fresh off this NASA high, Ive re-committed to the boat project. This thing WILL GET DONE.

My brother came in on Sunday for a week of boat building. We actually spend the first few days battling the cockroaches (รก la Stormship Troopers) that made themselves welcome during my long absence. We finally got around to some boat work on Thursday and will have the first layer of the chine glued in place by the time he leaves tomorrow afternoon.


This week at my house. Pro tip: Dont leave potatoes in cabinet for 5 months.

My mentality re the boat project has shifted. I was beginning to feel paralyzed by the sheer size of the project--  by all the work remaining and all of the things that could possibly go wrong. I am now thinking no further than getting the chine laminated. Then Ill think no further than cutting the notches for the stringers on the bottomsides. Etc. This seems to be a more effective mindset, as Im pretty sure Ill be able to get the chine in, and Im pretty sure I can cut a few notches.

An acquaintance from college sent me this poem written by a boatbuilder. While at the moment I cant relate to the romanticization of boatbuilding in the body, I was particularly amused/struck by the first line: 
And so it is, the boat has come to own you

Indeed, building Luna came to own me. I resented my previous self who thought building a gigantic sailboat in small-town Texas was a good idea. Time away from Luna was exactly what I needed to build up the guts to finish her. Looking forward to the next few months of boat work!
Ali and Logan Keenan
The not-so-little brother and I.

Buehler sailboat build epoxy
Slinging epoxy.

Buehler Emily sailboat build
The first chine piece glued in place.
Read More..

Book Shelves

All available space has to be used on a boat.  When fitted the kitchen I had 2 end units that had voids behind them. One each side of the boat.


Originally I was going to make a decor end infill, but the more I left it the more it became obvious these were destined to become book shelves.

So as usual a template was made each side.


This was used to make some end panels which I painted to match the side.


The addition of a shelf and a filler at the bottom completed the job.


And the same the other side. Accept this side has to be easily removable so the gas pipe and a joint can be inspected when the BSC is due.

So thats another job done.  Im running out of things that need finishing, so as it was such a nice day today I decided to re-varnish the oak bow doors, and while I had the varnish out I also did the oak thresholds which had been left and the oak vents in the rear doors.


Read More..

Kamis, 21 April 2016

Cutting Boatbuilding Costs

I recently had a situation that comes up on a fairly regular basis, often enough to be worthwhile writing about it. It varies but the core message is the same; "Your plans are too expensive, I dont want to pay so much for a few sheets of paper". I end up having to justify the price of my product to someone who is expecting a cheap deal and it has never resulted in a satisfactory closing.

When considering building a boat for yourself, or having one built by a professional, please bear in mind that you want to build a good and safe boat, one of which you will be proud and hope to own for a long time.

~ The plans are not simply a few sheets of paper, the paper is only the medium used to deliver a tremendous amount of information. When the plans are supplied in digital form by email, the negative feeling of the customer may be aggravated because even the paper has disappeared from the package that is supplied. The value of the plans is in the information, not in the paper. You can buy a pile of paper at your local stationers but they cannot sell you the information that you need to build a quality boat.
DS15 sportboat built by amateur Jim Foot in Port Elizabeth, South Africa. Photo Glen Meyburgh.
~ A quality boat design is the result of many, many hours of work, work that has been done by someone who has spent the time, taken the trouble and paid out a lot of money to get the training and experience needed to do a good job of designing that boat. A 40ft boat can take 500 to 1000 hours to draw accurate and high quality detailing. That is what you are paying for in the price of the plans.

~ If you have chosen wisely, you are also buying the accumulated experience and knowledge of someone who has learned, through thousands of miles and decades of boating, what makes a good boat, one that can be built by an amateur, with efficient use of materials, a boat that looks good, moves through the water efficiently and will give you great joy to launch and voyage.
?
Beautifully-built Cape Henry 21, by Dean Ivancic of Porec, Croatia
~ We all expect to be paid a reasonable wage for our working hours. The person buying the plans expects to be paid for his labour, why would he wish less for any person who is supplying a service to him? If we cannot get a worthwhile price for our work then we must abandon that work and move into another field of employment. I design boats for a living because I love doing so. I retrained myself from another profession that was not as enjoyable but would have given me much higher income. That doesnt make boat design a hobby nor a pastime that neednt pay a satisfactory wage.

~ If you want to pay a low price for a product then you must expect to receive a product of low value. That is the mindset that has resulted in our shops now being overrun with junk products from cheap manufacturers in the East, mostly not worth the price that is paid and not properly fulfilling the purpose for which they were bought. The purchase ends up being a bad investment purely due to hunting a low price.
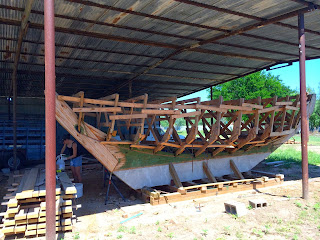
Didi 38 cruiser/racer built by amateur Stas Pechenkin of Irkutsk, Russia
~ There are places in a boatbuilding project that money can be saved or the dollars can be stretched a bit further. But you have to be judicious in choosing the places to save money. You will be spending a boatload of money to build a large boat and you need that money to be well-spent, a good investment. All of that money will go into buying materials and equipment to go into and onto what is shown on the drawings. The drawings themselves are likely to cost 2-3% of the total cost of the project. If you buy your plans based on price rather than on the quality of the design, you may save yourself 50% of the plan price, which is only 1-1.5% of the total cost. That is a very small saving but it can have a massive effect on the quality and value of the boat that you build. If a particular boat or construction method really appeals to you then you have good reason to buy that design. Changing to another design that doesnt really do what you want but costs less is really not a good reason for the change. Even if you get the plans for free, if they are for the wrong boat then you will be wasting your time and money to even start the project.

~ You can save money on the expensive shiny bits, then upgrade later when more funds are available. It will irreparably harm your boating experience if you build the wrong design but it will be done no harm if you buy good used winches and other hardware at a large saving. Make sure that the used hardware that you buy is to the required specification and in good order, that it has a useful life ahead of it. In a few years, when available funds permit, you can replace with new and sell the used items to another builder who is in a similar position to what you were.
Dix 43 Pilot built by amateur Dennis Wagner of Empangeni, South Africa.
~ Beware though, if you are tempted to buy used that very costly item, the sailing rig. If you find a used rig that you think is suitable for your boat, please first run the dimensions, mast section, rigging diameters and configuration past your designer for advice. A mast that you might think suitable may really be totally unsuitable for your boat for a host of reasons linked primarily to strength, which might cause it to fall down on deck in a tangle of bits. Something else to take into account is that the insurance industry generally applies a service life to the rig and expecting much beyond that may prove to be foolhardy. The service life is generally 5 years for sails, 10 years for rigging and 20 years for spars. If the items that you are considering exceed these ages then they may not be worth buying, should be examined very carefully or maybe even dropped from consideration.

Few people who build their own boats have endless funds. We all want to get the best deals on our purchases. We need to spend judiciously within the limited budgets that we do have available. Part of spending judiciously is to save money where it wont hurt the overall project.

Read More..
 
boat design plans - Powered By Blogger