Tampilkan postingan dengan label come. Tampilkan semua postingan

Rabu, 11 Januari 2017

Little Bit Of A Setback

Ive had a little bit of a setback of late, Ive been watching it hoping it would go away, but as its getting colder its getting worse.

So what is it?

The laminate flooring I used to line the ceiling is distorting. I suppose as the boat gets a tiny bit shorter.  Essentially is compressing and was beginning to ripple midships.  Other option is that the laminate is expanding with the damper weather.

Normally when you lay this sort of flooring its know as a floating floor because its not fixed anywhere and a 10mm gap is supposed to be left all around the edge of any room its laid in to allow for expansion etc.

Compounding this also is:- 1. I have had to glue it to the roof batons to keep it in place. 2. on the port side I did the whole boat in one continuous length of about 12.5m.  Its only this part thats distorted.

The planned repair is underway and involves removing the affected mid section and cutting in a expansion joint above the bedroom door separating the run.

So this is what its looking like.


I shall leave it a couple of days for it to normalise, I have cut some more of the glue to free up more movement.  Then it will be all put back up again and hopefully that will be the an end to the matter.
Read More..

Rabu, 16 November 2016

France Here We Come

OK not quite yet but we have the necessary qualifications to go.  Sorry to get you all excited.


Over the last month we have both been studying for the necessary qualifications we need to be in charge of our boat when we take it to France.

To be legal unless you are on a hire boat in which case you need no training, knowledge, experience what so ever! the master of the vessel needs to have a VHF radio licence, to know the CEVNI rules and demonstrate your competence to handle a boat, in our case over 10m, this is the ICC part.

We did the VHF first about 3 weeks ago on a day course.  This we both found very interesting, I especially liked the DSC part, but this is pretty useless on inland waterways accept for group calling or calling a known MMSI of another boat, a bit like a phone number.

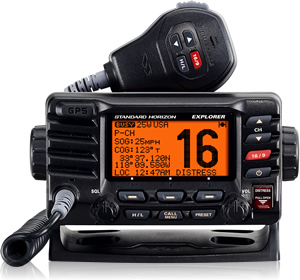
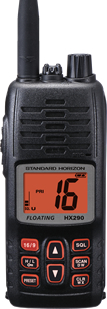
Once we had our license I bought a fixed radio and a handheld.  Two are recommended for France.  We chose models form Standard Horizon.  The fixed set also has GPS which is a bit of an overkill for inland waterways but it was only a small amount more and it gives speed and heading information as well as the time. The handheld is a just simple VHF only set.

This is the main set. But ours is in black


Full details 

This is the handheld.

 
Full details


Once we had the VHF set it was then necessary to apply for Ship Radio License to get an MMSI number.  This was easily done online on the Offcom website and resulted in our own MMSI number 350974?? and our UK call sign 2GHQ6.  Part of this registration my personal details so the MMSI is tied to a user in case of emergency and I suppose misuse.  Once we are in Europe I will programme in a the ATIS

Then it was down to studying the CEVNI signs.  Its a bit like learning the highway code but for the river, except it’s not as well organised as its (IMO) a bit of a dog’s dinner as its compiled by bits from all over Europe.  As well as the signs theres also lots of different signs on various types of boat by day and night and differing in the type of vessels and what it’s doing.

This is the full CEVNI and here is a set of flash cards I compiled (with permission) from the initial work done by Bryan Griffin.  In the end the multiple choice paper was passed by both of us simply because we drilled ourselves with the cards for a good couple of weeks off and on.

Meet our new crew member MOB.


The practical part for the ICC Involved us taking our boat our with our examiner for the afternoon and demonstrating MOB (Man Over Board) recovery procedures and other boat handling and mooring skills as well as questions about river  craft, safety, emergency procedures.  Most of the handling was simply demonstrating what we do each time we take the boat out, but we did have to practise the MOB as we had never done this so  a good few ours were spent pirouetting around retrieving our very own MOB, yep a  buoy tied to a bucket.   The bucket acts as the simulated weight and sea anchor. Each time we practised this MOB it really got the adrenalin going.  Even though it was only a buoy and bucket it becomes so real.
Anyway, after that the instructor / examiner showing me my boat WOULD go backwards under control despite my insistence it wouldn’t and a final few questions he told us we had both passed.

I have also registered Avalon on the SSR and now sport the Reg. No.SSR1535623

I do have a massive blog to do on the very complex subject or Generators batteries and charging. I will get this done ASAP as I have learnt a lot with the help of Clive one of my blog readers.
Read More..

Kamis, 20 Oktober 2016

Advanced Alternator Regulator

To finish the alternator modification I have added to the house battery system an advanced alternator regulator made by Sterling Power Products  I chose the ProD model.


Unit on the right.  The left is the MPPT

The first thing to do was to connect 2 wires to the inside of the alternator.  Only one of these wires is used but it need to be determined which.


These wires go to the brushes in the alternator.

Cap back on and wires out of a convenient hole.

With the alternator running normally its necessary to identify which type of alternator sensing you have.  Mine is a Negative sensing.
Once the right wire is found simply snip the unused one off.

This explains what they do but in a nutshell it changes the charge profile of the original regulator in the alternator without modifying it. It will fail safe to the alternators own regulator if it encounters any number of possible problems protecting the alternator and batteries from themselves as it makes the alternator & batteries and connecting cables work much harder for longer.  The full manual is here. http://www.shop.sterling-power.com/acatalog/pdar.pdf

The additional load on the alternator started to cause the belt to slip on engine start up as the ProD loaded the alternator.  I could have added more tension to the belt but this just adds extra loading the the engine front bearing and the alternator bearing. To overcome this I applied some Belt Dressing which has done the trick.


While out this week the engine clocked up 200 hours.


Its very noticeable how much quieter the engine is becoming as time goes on, and since the alternator modification how much smoother it feels.  I can offer no explanation for this tough.

I have decided to change the central heating boiler and have ordered a Hurricane CH25


The Mikuni MX60 has been and continues to be great, its done sterling service for 2 winters but I want the greater flexibility the Hurricane offers with its zoning, hot water only and the added feature of being able, with the use of an additional heat exchanger, use the the engines waste heat to heat the radiators.

More on this soon.

Another modification on the horizon:-   I have ordered a new propeller.  The current one is 21 x 16 and I shall be replacing it with a 21 x 21.  I should get this in a few weeks and have a slot booked on a local crane day but I might try to do it in the water.  I looking into the feasibility of this.

.
Read More..

Sabtu, 18 Juni 2016

Plumbing Has Come To Life

This morning I fitted the taps and made the final plumbing connections.

Kitchen

Bathroom

Shower

Once the cold side was checked and the calorifier filled I fired up the diesel heater and in half an hour I had seriously hot water.

I am not very happy with the water pump.  Its very noisy so I am going to mount it on some soft substrate.  If that dont work then I will be looking for another one.  The one in my motorhome is the same capacity but is "for motorhomes" as opposed to "for boats".

With all the water working I was able to fill and test the macerator toilet.  When I say test I do mean a  clean test.  Ill have to trust that it will deal with matters once afloat.

And finally as the water tank filled the water tank gauge came to life with some readings.  Once the tank is full I can calibrate it.  That is if I can find the instructions!

Read More..

Jumat, 13 Mei 2016

Time Hatch Come Today

Cant put it off another day.... to misquote the Chambers Bros. song. I ran out of other things to work on so I finally had to come to grips with whacking a big hole in the deck of my boat. First, the screws and shims that had held the hatch frames in place were removed. Then holes were drilled from underneath at the corners of the hatches to define the margins. Once underway, it seemed like no big deal. The first picture shows the hatch frames put in place before the subdeck and cover planks.


After finding the corners, I blue taped over the margin areas and drew the margin lines with the aid of a yard stick. With a sabre saw, I cut just the hinge margins, cut the hinges to length and mounted the hinges. Then the remaining fore and aft margins were cut to remove the hatch in one piece.

After cleaning up the edges on the hatch and hatch opening, support pieces were made to support the hatches when closed. These pieces were screwed in place on the boat. Then the hatch center margin was cut on the table saw and back to the boat to install the hinges again.


The center margin and underlying supports were trimmed with a bevel to provide swing clearance when opening.


Secondary latch catches were installed on the underneath side of one hatch and then the perimeter banding was cut and installed.


I still have the primary latch/handle that needs to be installed.


Update: 
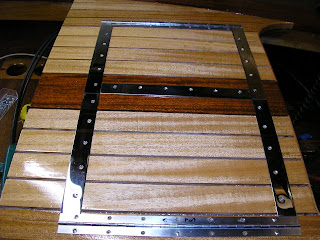
The last picture shows primary latch installed. The latch plate will need to be extended since the latch location is too far away from the margin due to not wanting to interfere with perimeter banding.


Read More..
 
boat design plans - Powered By Blogger